
1.
Set up Your
Print and Cut File
Open Silhouette Studio and select your design. Some designs
are specifically for printing and cutting (just enter “print & cut” in the Store's search box).
NOTE: If you plan to make several of the same design, wait until the first one is completely set up.
Open your design into the Silhouette Studio work area:

If your design has a hole or cutout, make sure it’s is set
to cut. To do this, you must first ungroup it. Select “Object” and then “Ungroup”:

After it's ungrouped, open the Cut Settings
window:

Select just the area you want to cut, and make sure it’s set
to “Cut” (if not, then select it):

Make sure the outer edge of your design is also set to cut (as
well as any other areas you want to cut). For the outer edge, select “Cut Edge”.

Once you are satisfied with your design, immediately regroup
it (if it has multiple parts, you must hold down your keyboard’s Shift key to
select each one):

Now you can resize your design and move it around, and it
all the parts will stay connected.
If you want to make more than one of the same design on your
page, open the Replicate window (and
select the number of designs you want to print):

NOTE: I wanted to print three different
designs, and I only wanted one of each to print, so I skipped this step.
2.
Add
Registration Marks
This is the most important part!!! Open the Registration Marks window:

Use the pulldown menu to select Style Type 1 – CAMEO,
Portrait, Curio

Gray areas and red lines will appear on your work area. No part of your
designs may touch the gray areas or red lines; if any parts touch, move them.
Here, mine touch (this is incorrect):

Here, I have adjusted them so they do not touch (this is
correct):

3.
Print
You will use your computer’s normal printer to print your
designs. Open the Send to Printer
window (don’t forget to load cardstock and to use your printer’s settings to select
card stock, if desired):

When your design prints, Silhouette Studio will place
registration marks at the top corners and the bottom left corner. These marks tell
Silhouette where to cut the design:

4.
Cut
IMPORTANT: You should
now adjust your cut settings (in Silhouette Studio) as you normally would (for
card stock or copy paper, etc.).
To adjust the paper type, select the Cut Settings window:

Then, select your paper type. For example, I used card
stock:

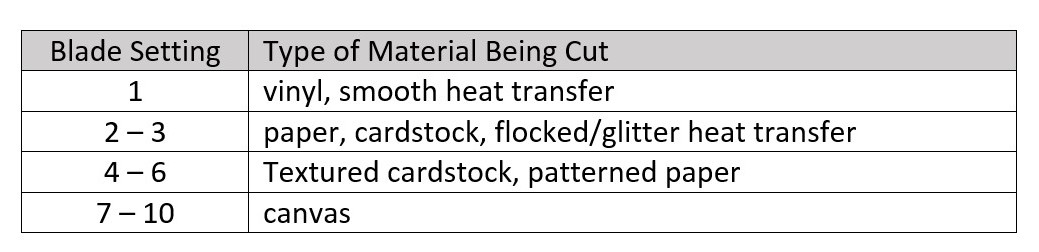
Equally important, don’t
forget to change your blade setting (in the Silhouette machine) if necessary. Generally,
I use the following settings (unless my blade is older/duller, then I use a
slightly higher setting):

After you adjust your cut or blade settings as necessary, place
your printed design on the cutting mat; it
is very important that the top corner of your paper lines up with the top corner
(black grid lines) of the mat AND that you place the paper with the square
registration mark at the top left of the mat.
These are the black grid lines and the square registration
mark:

Line up your paper along the grid lines so it ends up like
this:

Then, load your mat. It's very important to load your mat correctly or the
Silhouette will not be able to find your registration marks. Make
sure the edge of your mat is lined up with the blue line on the Silhouette
machine:

Then press the “Load
Cut Mat” button so the rollers start feeding the mat into the machine:

When your mat is ready, go to Silhouette Studio and select “Send to Silhouette”:

Then, select “Start”:

If your mat is loaded correctly, the machine’s blade will start moving around your paper to detect each registration mark, and then it will begin to cut.
The Silhouette Machine should cut out your design to
near-perfection!
