Everyone who knows me knows that I love a good theme, whether it's for a party or anything else! I offered to host a child's adoption party recently, and he requested a Harry Potter theme. Here's how it all turned out:
I used bulletin board paper to create "Platform 9 3/4" for the guests to enter the party. The scrolls said "Welcome to Hogwarts" and listed the "Wizards' Homework" (essentially a list of activities at the party that I didn't want the little ones to miss).
Voldemort's snake, Nagini, was a giant Cocoa Krispie treat. We later added green candy eyes:
The gorgeous cake came from my favorite bakery, Freed's. I just added the magic wand and Harry Potter glasses.
The "winged keys" looked great! I hot-glued real feathers to large metal keys that I purchased at Michaels for $1 each.
These "house banners" were some of the very few things I purchased - rather than made - for the event. I found them on Amazon.
I blew up a big picture of Dumbledore that I found online, then placed it in a picture frame from Goodwill that I had spray-painted to look aged.
The entry to Honeydukes was just a few plastic tablecovers, attached to completely cover the door.
We wanted a funny way to tell kids that some areas were unsafe/out-of-bounds, so we used this Dumbledore quote from the movie.
"Moaning Myrtle" is actually a Halloween ghost. that I ordered from Amazon. I added a doll wig, with hair trimmed to look more like Myrtle's, and a pair of doll eyeglasses that I spray-painted gold.
Arrow signs at the craft stores were expensive - about $7 each. I found each set of three arrows at the $1 store. They were already decorated for a Hawaiian themed party, so I spray-painted over the Hawaiian words and then used my Silhouette machine to make Potter-themed words. I painted the edges blue and glued on some metal stars to make them a little fancier.
A large (30" x 40") piece of foam board provided the perfect backdrop for the "Pin the Scar" game. I made the words, hair and glasses on my Silhouette.
The game's blindfold was a Gryffindor scarf that I made from a patch that I sewed on a simple striped scarf. Both were purchased online from Amazon. I made the scar stickers on my Silhouette, but if you don't have a Silhouette machine, you could print them on full-page sticker/label paper, and cut them out by hand.
The Wand Station was the biggest attraction for all the guests - even the adults wanted to take home the homemade "magic wands."
There are lots of tutorials online to make wands. There's a good one
here. They weren't difficult to make, just time-consuming. I used chopsticks, hot glue, and brown spray paint. Once dry, I painted the raised areas with silver or gold acrylic paint, then I dry-brushed them with black acrylic paint to make them look old.
I found the Wand Guides online.
One of my favorite party elements. I made this Ollivanders sign from a wooden sign that I found at JoAnn Crafts for 70% off. I simply spray-painted over the original sign, then used it as my base. You could also find and use an old tray or piece of art from a thrift store. The curlique "O" is from JoAnn, and the white letters were made on my Silhouette. When all that was done, I hot-glued on the metal stars and one of the homemade magic wands.

This picture doesn't do justice to the "flying letters"! Although they took several days to make - printing them on cardstock, adding the Hogwarts seals, and stringing them on fishing line - the effect was magical. I printed the letters on card stock. You can find the printable
here. Then, I folded them in half and glued them together. I used a brown permanent marker to color the edges brown because I didn't like the white edges. Next, I used a red hot-glue stick and a Hogwarts stamp from Amazon for the seal. To string them, I used the smallest diameter hole punch I could find to make 2 holes in each letter. When stringing them to the fishing line, I knotted the line so they'd stay in place.
The "sorting hat" was purchased from Amazon, but there are some good tutorials if you want to make your own. I got the "sorting quiz" online; you can find it
here. I made "quill pens" for the kids to use by hot-gluing feathers to black Bic pens. Have I mentioned how much I love/use my hot glue gun?
Each child got to take a sticker with their "Hogwarts house" on it, as determined by their "sorting quiz" answers.
This sign, made from wood I purchased at JoAnn, led kids to the secret "cupboard under the stairs."
I made the temporary tattoos on my Silhouette machine, with Silhouette's temporary tattoo paper. If you don't have a Silhouette machine, You could still print the design on their paper, then cut them out by hand. In fact, you don't even need to cut them into the lightening bolt shape, because only the colored printer ink shows up on the tattoo. The glasses are from Amazon.
I purchased all the battery-operated candles at the $1 store; most even came with batteries! The "Dementor drops" were caramels, because chocolate would have melted in our desert heat. I used books from my personal library, covered in "parchment" copy paper. I printed the book titles from
this website.
The "dementor" is made from a Halloween skeleton decoration. His face was covered in masking tape, then painted black; his hands were painted black, too. Here's a
good dementor tutorial. Props for mine go to my son, Chris, who made this one for me. I was running out of time, and he did a much better job than I could have done. We elected to use the existing skeleton hands rather than make our own.
The "floating candles" looked especially cute at night, when we turned them on. I purchased mine in bulk from Amazon, but later found them for much less at the $1 store.
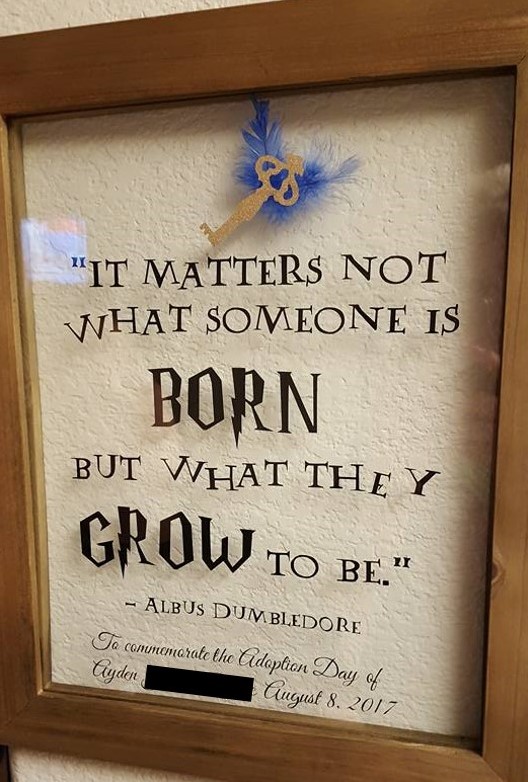
I loved finding adoption-friendly Harry Potter Quotes to use at the party. Here are a few more personalized decorations that I made (with the guest of honor's name redacted to protect his privacy):
The kids could make "withdrawals" (of chocolate coins) at "Gringotts Bank." To reduce the amount of stuff I needed to fill a container, such as the treasure chest used here and for the "magic wands," I covered foam blocks in aluminum foil and placed them in the bottom of the chests.
The "Monster Book of Monsters" was super fun to make. I bought an unfinished wood "book" storage box from Michaels, glued on some "fur," and then used Sculpy clay to create the mouth, teeth, and tongue. The eyes are also from the craft store (look for "cat eyes" there or online). I made the letters on my Silhouette machine, but you could always make and print them from Microsoft Word.
The "Butterbeer" was made from cream soda (I eliminated the bubbles by heating it, but you don't have to) with butterscotch flavoring added. I covered the whipped cream cans with labels.
Although the pictures of Honeydukes didn't turn out so well (thanks to the sunlight streaming in behind the table), you can get the gist of it. I had "Quidditch Brooms" (mini peanut butter cups with mini pretzel "broom handles"), "Sour Slugs" (sour gummy worms), "Magic Wands" (licorice sticks), "Fizzing Whizbees" (Pop Rocks), "Bernie Botts Every Flavour Beans" (traditional Jelly Belly flavors with a few boxes of the gross flavors added in at the request of the honored guest), "Owl Droppings" (Whoppers) and "Golden Snitches" (Tootsie Roll pops covered in gold candy foil, with hot-glued feathers). I also made Honeydukes "to go" bags: small white $1 store bags with handles, onto which I hot-glued Honeydukes labels.
Next time, remind me to use heavy paper to block out the sunlight before I add the plastic table cover "stone walls." I decorated well into the night, and didn't realize the sun would be a problem until the party started; oops.
I had to come up with a creative solution to cover the sports equipment in our gym, where Honeydukes was located (it was too tough to move our treadmill, etc.). I covered everything in cheap white paper drop cloths, then added a giant spider (aka Aragog) and hot-glued a ton of baby spiders.
The cute "wizard" who took this picture was a young lady we hired to welcome our guests. The kids loved when she handed them their "homework" scrolls. The sweet girl in the background is wearing a pink apron with the Honeydukes logo. We hired her to "work" the Honeydukes candy counter.
The tabletop Quidditch game was fun. I made the hoops from dowel rods, embroidery hoops (screwed to the end of each dowel), a piece of wood scrap, and 3 $1 Store rulers, all spray-painted. I ordered the red "bludgers" (ping pong balls) from Amazon. The banner, like all the others, was made on my Silhouette machine.